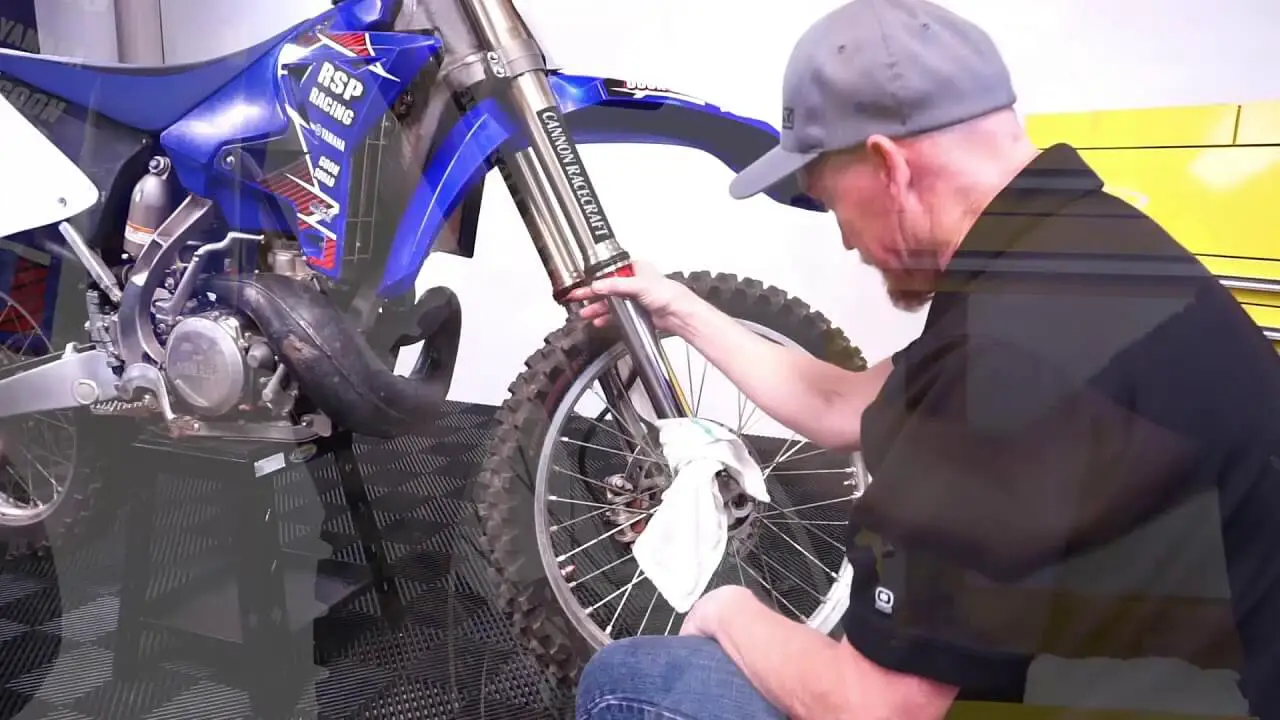
How To Replace Fork Seals On A Dirt Bike | Easy Steps

(Last Updated On: March 17, 2023)

In this article, we’ll discuss how to replace fork seals on a dirt bike. Leaky fork seals are often considered a minor problem, but if left unchecked, they can further damage your fork internals. When fork seals leak, oil can escape and contamination can enter the fork. This can cause the fork to wear out prematurely and may lead to failure.

Leaking fork seals are one of the most common problems with dirt bikes. If left unaddressed, leaking fork seals can allow dirt and other debris to work their way into the fork internals, causing further damage. In some cases, fork seals can also cause oil to leak from the forks, resulting in a loss of performance.

Different suspension manufacturers have different ways of disassembly, so always be sure to reference your owner’s manual. In most cases, you will need to remove the shock absorber from the frame or fork, then disconnect the springs. After that, you can disassemble the rest of the suspension components according to the manufacturer’s instructions. You should also check out my article on dirt bike tricks for beginners where you find some amazing tricks to learn.

Tools that are required for replacing fork seals

Before you begin replacing your fork, it is important to ensure that you have the correct tools in your arsenal. You will need a set of new seals to install, as well as a few other tools. Be sure to consult your manual for a complete list of tools before beginning this project.

  • 47mm ProX fork seal kit
  • Pen and paper
  • Microfiber towels
  • Seal and O-ring grease
  • Cleaner
  • Oil drain pan
  • Wet/dry sandpaper
  • Fork cap wrench
  • Socket set

Once you have gathered all of the necessary tools, you can begin the process of replacing your fork. This can be a tricky process, so be sure to take your time and follow all instructions carefully. With a little patience and effort, you can have your new fork installed in no time. You should know how much dirt bike insurance costs and how to get cheap dirt bike insurance.

Place your bike on the stand and remove the front tire

Position your bike on the stand so that the front wheel is off the ground. Loosen the axle nuts or quick-release skewer with the wrench. Unscrew the retaining ring with the retaining ring removal tool and pull the tire off the rim.

Replacing the fork from the bike (Step by Step)

Removing the fork from the bike is a simple process that can be done in a few minutes with the right tools. The first thing you will need is a set of Allen wrenches. You will also need a Phillips head screwdriver.

Loosen the bolts that secure the fork to the frame. Remove the bolts and Washers. Gently pull the fork out of the frame.

  • The fork can be set in a tight clamp by clasping it with the hub carry. This will get the fork set up with the goal that it tends to be chipped away at securely.
  • To eliminate a fork from a bike, utilize an attachment or torque to completely slacken the base bolt under the hub drag.
  • The base bolt should be slackened first, and afterward, the fork should be compacted by pulling the highest point of the fork toward the hub carry.
How to replace fork seals on a dirt bike | How to replace fork seals on a dirt bike | How to replace fork seals on a dirt bike
  • Pack the fork and uncover the damping pole. Utilize the fork end of the fork cap wrench to slide the damping into the center of the “U” molded prongs behind the jam nut. Gradually let the fork bounce back to lock the instrument against the pivot carry.
  • You’ll require an unassuming wrench, an attachment/wrench, and two hands for this step. Put the unconditional wrench on the jam nut and the attachment/wrench on the bounce-back bolt and slacken the bounce-back bolt. Eliminate the bounce-back bolt from the damping bar alongside the inward changing bar.
  • Pack the upper cylinder toward the lower cylinder to eliminate the fork cap wrench from the damping bar jam nut and delivery the pressure on the spring.
  • Eliminate the fork from the tight clamp, be mindful so as not to spill any oil, and reposition the fork in the tight clamp so the upper fork tube is clipped decently close to the highest point of the fork calculated down. It is essential to brace in the cylinder where it is the most round with no shape. This is where the base triple clip holds the fork.
  • Utilizing your level-head screwdriver, separate the residue seal from the upper cylinder. Then, eliminate the inward seal cut from the depression inside the upper fork involving the level head also.
  • With these parts cleared from the cylinder, hold the lower tube with one hand and the upper cylinder with the other. Slide the lower tube into the upper cylinder, then, at that point, immediately pull the lower tube away from the upper cylinder with enough power to isolate the two cylinders with the oil and residue seal staying on the lower tube.
  •  Eliminate the slide bushing, guide bushing, base washer, oil seal, seal clasp, and residue seal from the highest point of the lower tube, making a point to put them on the work seat if they request they fell off. It is likewise vital to take note of how the oil seal was situated. Mistaken situating won’t seal oil.
  • Utilizing a clean microfiber, clean your lower tube and investigate the cylinder for dings and sharp burrs that might have made the seal spill. If scratches and pods are found, utilize the 600-coarseness wet/dry sandpaper greased up with the suspension clean to eliminate any sharp edges. Wipe the cylinder down with a clean miniature fiber cloth to eliminate pollutants from sanding and put the cylinder on your work seat.
How to replace fork seals on a dirt bike | How to replace fork seals on a dirt bike | How to replace fork seals on a dirt bike
  • Review your aide and slide bushings, washers, snap rings, and O-rings. If any of them show harm or unreasonable wear, you might need to think about supplanting them. If they look OK, a decent cleaning ought to be adequate. Assuming they should be supplanted, fork bushing units can likewise be obtained from ProX with the same OEM quality and reasonableness of the fork seals.
  • In the wake of cleaning the bushings, apply seal and O-ring oil to the Teflon covering of the bushings as well as within the oil seal and residue seal for oil.
  • Place your seal shot over the fork tube far to the point of covering the side bushing diary. In a specific order, slide the residue seal on the cylinder, then the seal cut, oil seal, base washer, and guide bushing. Eliminate the seal shot and spot the slide bushing back in the diary.
  • Delicately place the lower tube back over the damping bar and into the upper cylinder far enough to permit the slide bushing to hold the cylinder set up. Slide the aide bushing and base washer into the upper fork tube. Utilizing your seal driver, drive the base washer down and into the cylinder opening. Rehash this cycle with the oil seal, making a point to drive the seal far to the point of uncovering the woods for the seal clasp to fit in. Place the seal cut in the cylinder, ensuring the clasp fits in the forest 360 degrees around. In conclusion, utilize the seal driver to drive the residue seal into place at the lower part of the upper cylinder.
  • Un-brace the upper fork tube from the tight clamp being mindful so as not to shift the fork down and lose oil. Reposition the fork in the tight clamp and cinch it by the hub drag with the fork cap calculated down.
  • Cautiously pack the upper cylinder to uncover the damping bar through the lower part of the hub drag and spot the forked finish of the fork cap wrench behind the jam nut. Gradually discharge the pressure permitting the apparatus to choose the lower part of the hub drag.
  • Re-introduce the agent pole and bounce back the bolt onto the damping bar. Utilizing the unassuming wrench and attachment/wrench, fix the bounce-back bolt until it reaches as far down as possible against the jam nut.
  • Compress the upper fork tube towards the pivot drag to eliminate the holding apparatus. String the bounce-back bolt into the hub drag and force to the detail in your proprietor’s manual.
  • Reset the bounce-back clicker to your ideal settings. Reposition the fork in the tight clamp again with the fork cap calculated up, cinched respectably close. Utilizing your fork cap wrench, slacken the fork cap from the upper cylinder. Try not to eliminate the cap from the cylinder.
  • Eliminate the fork from the tight clamp and put it up standing on the floor. Completely unthread the fork cap from the upper cylinder and slide the external cylinder down.
  • Presently, add a deliberate measure of oil to the fork. This will be an expected measure of oil contingent upon how much oil you have lost because of the flawed seal. Generally speaking, 10-20cc of oil will be satisfactory, nonetheless, it’s vital to ensure you have your manual’s suggested measure of oil in your fork.
  • Slide the external cylinder back up to the fork cap and string the cap into the cylinder. Utilizing your fork cap wrench in one hand and holding the fork tube in the other, jerk the cap firmly onto the fork to seal the cap to the cylinder.

Final thoughts on how to replace fork seals on a dirt bike

When replacing fork seals on a dirt bike, it is important to keep a few things in mind. First, different suspension manufacturers have different ways of disassembly, so always be sure to reference your owner’s manual. Secondly, always clean and inspect the fork tubes before installing the new seals.

Finally, be sure to use the proper amount of grease when installing the new seals, as too much or too little can cause problems. I hope after reading my article, your confusion about how to replace fork seals on a dirt bike has been solved. If you’re unable to replace the front fork, then contact the dirt bike mechanic.

I hope you enjoyed my article. This article has taken a look at how to replace fork seals on a dirt bike. If you have any questions about how to replace fork seals on a dirt bike, please leave a comment below.

Leave a Comment